


Intro
Creating a blog is quite easy, but takes some time to research options and personalize. The problem is that there are too many ways of doing it and it's not easy to try them all and think about future needs. Well, I spent way more than 2 hours setting up this blog. But, hopefully, this article will show you the shortcuts of the process. I didn't want to get into details about available options as there are already a lot of articles, but be sure that I've researched a lot of aspects of what I am going to recommend.
Motivation
I have wanted for a long time to have a blog to share my thoughts or to create some technical tutorials with encountered work-related challenges. But I thought that would take too much time to do it professionally. Do you think the same? Well, that's not quite the case if you are ready to make the best use of the tools you already have and start the actual writing.
My needs
These are the ideas I've started research with:
- I want to host articles on a dedicated platform for software developers or tech people. This would help me with the audience and would be easier to customize.
- Would be nice to have a dedicated domain to create a sort of personal brand.
- Platform should be fast, eye-catching, easy to use, open to external integrations, and focused on content.
Hashnode
If you did not hear about it, that's because is not the most popular or biggest platform, not even for the tech niche. But there are some features good enough and easy to use that deserve a try:
- free to use
- Markdown language
- GitHub automatic backup
- CDN support
- free SSL
- custom domains and free subdomain in the format xyz.hashnode.dev
- canonical URLs
- built-in monetization
- SEO optimizations, and more.
You can find details here or here or right on official website.
There are a lot of cool features and I am sure more will come. Additionally, they say will remain forever free. For now, the platform is growing as VC funds back them. Details are here.
If you are convinced to use the hashnode platform then please consider using the following link referral. They promise to unlock some features earlier for me 😎.
Customize blog
- Choose a good name for your subdomain.
Tip:you can keep it simple and use parts of your full name. Don't worry, you can change it later from the dashboard. - How would you want your blog to be indexed? Update SEO title and description.
- If any, import articles from other platforms:
Medium,Dev.to,Markdown,RSS. - Update blog name and description.
- Add links to your accounts to connect with others.
- Enhance your brand with logo and images.
Tip:multiple platforms help with this. Most require 5-10$ to download assets. For free, you can use this.
Choose a domain
This is an optional step. However, it looks professional to have your domain. Here are the steps involved.
- Choose your domain name registrar. I used Namecheap because is one of the most recommended and offers free privacy to the owner.
- Choose a domain name and TLD (extension). The most popular and recognized are .com, .net, .org. Or get a niched one like .io, .dev, .tech. Or anything else that makes the most sense for you 😁.
- Set up mapping to Hashnode. In the Namecheap dashboard go to Manage then Advance DNS then Host records and add similar information:
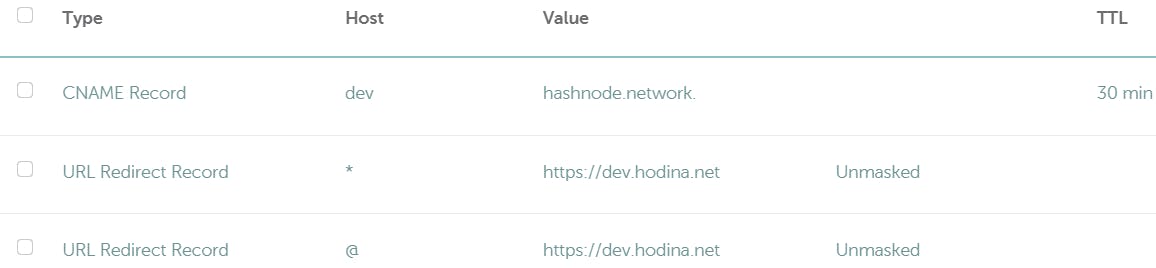 I chose to map the blog to subdomain dev. Maybe in the future, I will create a landing/profile page for the domain. But for now, all other routes(including subdomains) redirect to the blog. You can do the same or just map the entire domain. Official tutorial is here.
 - Go to the Hashnode dashboard in the Domain setting and add your (sub)domain. After a while, you should see 3 green checks. SSL works too! Official tutorial is here.

Profile/About page
This is optional but may motivate your readers to get in touch with you. Provide some personal information, random facts, and contact details. Go to Pages and create your best profile page. From Navbar add a link to it. See mine.
Enjoy
That's it! Your blog is ready. Go ahead and write your first article!